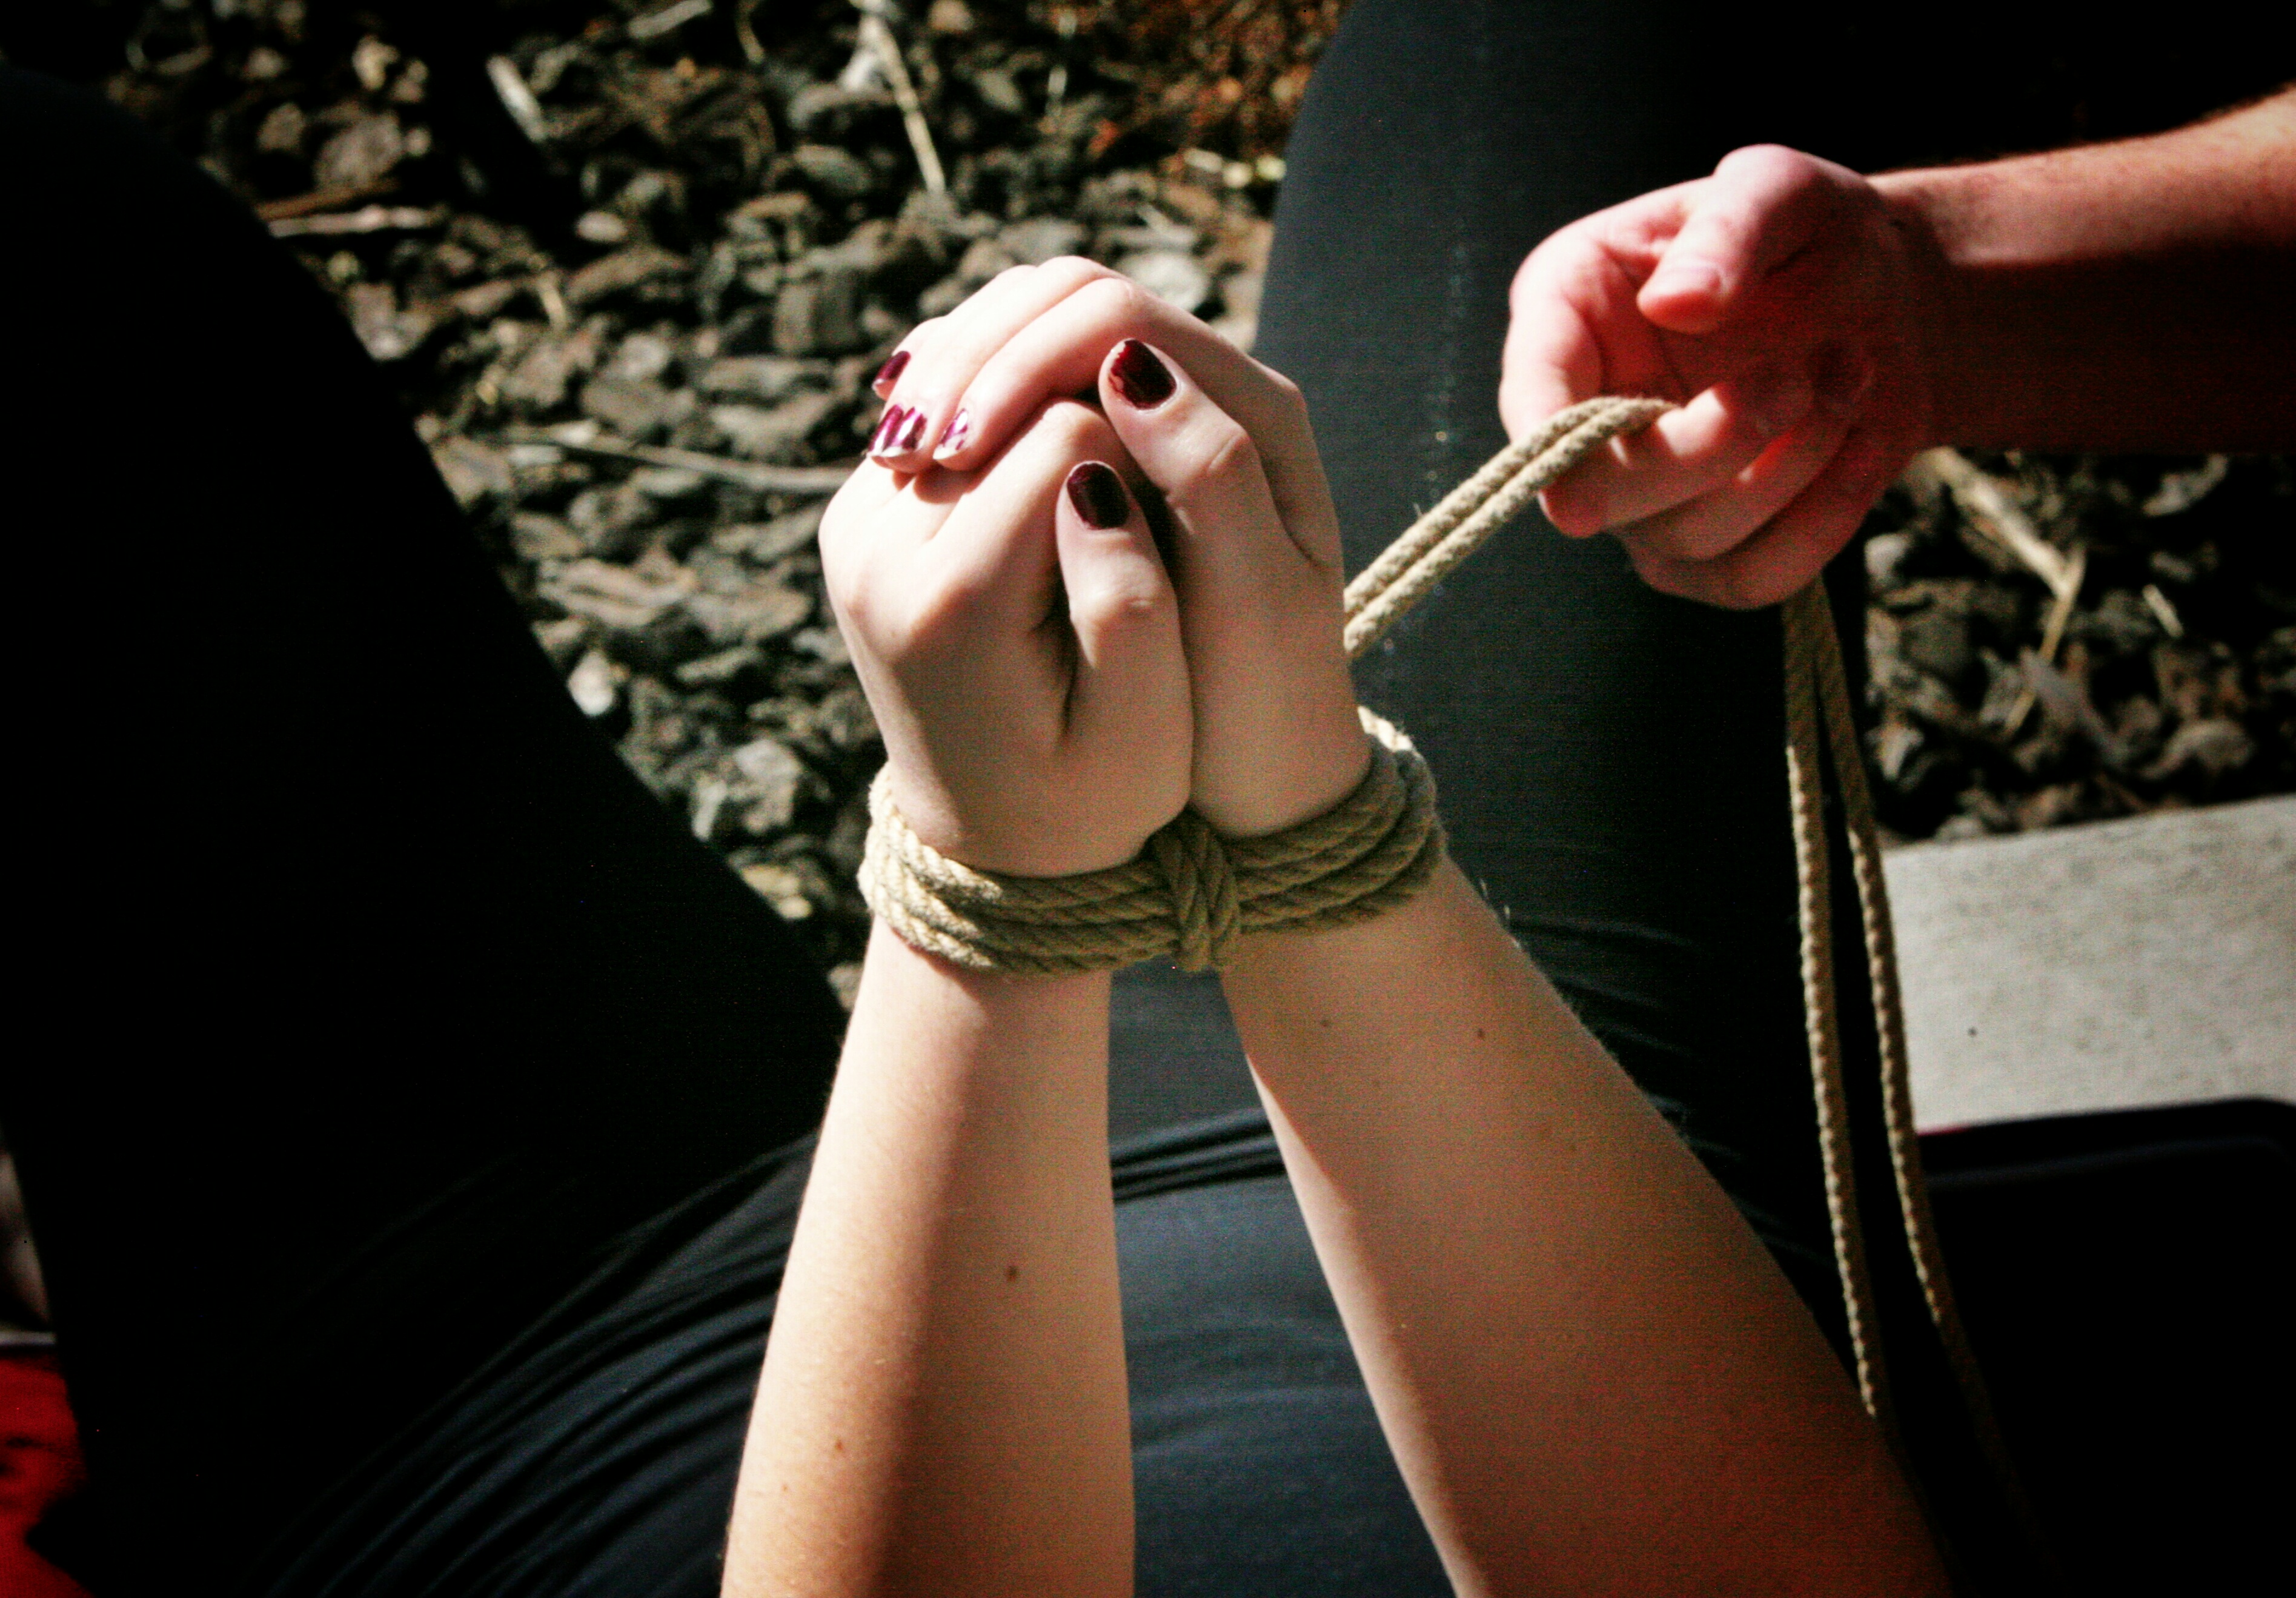
There’s tying wrists, and then there’s tying wrists in such a way that it’s prettier, more inescapable, and pretty much guaranteed not to tighten down on your partner.
All of which I’m a fan of.
So today I’m going to share my favorite way of doing that.
Often, when people tie wrists, they leave the knot on top of the wrists.
Which isn’t generally a problem; because you’re tying a nice, obedient person who’s looking forward to all the good times. Other times, you’re tying someone who’s going to be pesky and try to escape, for whatever reason.
And that’s when having a knot on top becomes a problem; because that means that the person tied up can easily reach the knot with their teeth, and proceed to wreak havoc on it.
The fact that the knot is on top of the wrists also means that it just doesn’t look as clean and tidy as it could; while looks aren’t that important during play, it’s still nice to have good looking ties on other occasions, like when you’re leading someone around at a party, doing ceremonial or aesthetic rope bondage, whatever.
So it’s good to have another way of doing things.
Here’s the recipe.
Step One: The Position: grasp your rope bottom firmly by the wrists, bring their hands together in front of their chest, and using their joined wrists as a handle, push them firmly down onto their back, so that they’re now lying down. This presents the bottom of their wrists to your convenience, and also has the added advantage of giving the scene a very assertive, directive flavor right from the beginning.
(Pro-Tip: Telling the person you’re tying to put their elbows together will make your life easier; this means you’re tying a column, as opposed to a triangle. Learning this saved me a lot of hassle.)
Step Two: The Tie
Begin wrapping the rope forward over their wrists.

Make sure you get at least two lengths of doubled rope over their wrists.

Once you’ve done that, bring both ends of rope upward.

And now cross them over
Pro-Tip the second: if you don’t have enough room to wiggle the bight between her wrists (or under the bands, later on) they’re too close together. Give yourself a little slack and tell the person you’re tying to separate their wrists a little more. It helps a LOT.

The bight goes underneath ALL of the wraps. That’s the top set, and the bottom set on the other side of the wrists.

While the other hand forms a loop by making a simple twist.

The bight, marked with arrows in this picture, then goes through the loop I made in the previous picture, and then under just the TOP set of wraps, on this side of the wrist.

Now put the bight through the loop again, for the last time (it’s now gone through the loop twice)

And tighten down. This is mostly accomplished by pulling the trailing end at the top of the photo, which tightens down the knot and holds it closed.

Ta da! A clean, flat, compact knot, which I have never seen collapse, and which won’t tighten down on your partners wrists after it’s finished. It’s a variant of a bowline, closely related to the Sommerville Bowline, Strugglers Knot, and Burlington Bowline. All of which are built on the same principles. All the tightening goes to just that top band of rope, so it’s not pinching both bottom and top bands of rope together too much, and the wrists aren’t being badly compressed.

And the final result looks so damn pretty. All clean and smooth and nice looking. Mmm, that there’s a a good looking set of bound wrists.

Whatever else you do with your trailing ends, however you incorporate it into a tie, that knot will hold everything closed without compacting the bands of rope together any further. Which I always find helpful to know; it means I’m now free to have more fun without that niggling worry.
[Just a thought; if people can let me know whether these instructions make sense and if they can follow them without difficulty, that would be enormously helpful. Any difficulties may be able to be resolved with editing]
Credit for photos go to cbt42, a very cool erotic photographer I happen to know.


This and the single-column are very useful knots to know, and your instructions were very clear, I was able to get it down very quickly. Thanks!
Ah, thank you! It’s really helpful to know that the instructions make sense. I know it’s worked pretty well for teaching in person, but it’s a bit different when you’re relying on text and and pictures to convey the same thing. I appreciate the feedback!
If you cross the wrists and tie in an X pattern and finish knot between arms is more secure as wrists can’t twist or move
I was not clear that you wrapped up using the bite end and not the trailing end(correct?) at the start. Of course you could do either but the directions of the rope would be different than pic. I do like this knot, though and the easy no collapsible element. One thing Perhaps, when suspending arms with this knot( of course not all body weight), where is is better to have rope pull, on top of wrists( which would be here as lift away will be at bottom wrists), or opposite. There is sensory branch of the radial that runs to top of thumb so for that aspect may be better to put knot and running end at top of wrists. And of corse if arms are pulled up no biting possible. Thanks for your effort!!
Hi Pete!
Nice post, really! Thanks. But like Alex S said, it’s unclear where the bight is in those first few pictures.
Anyway, I’m finding your posts very educational, I’m a newbie at this, and it’s easy to follow your instructions.
You know what, you guys are right. Thanks for the feedback! When I get some time after I finish my current project, I’ll put some thought into fixing that up
Very nice tutorials. I much prefer this step by step narrative with photos instead of video. Thank you!
Does this two column tie have a name? I figured out from your glossary that your one column tie is the Burlington Bowline. I like to know the names of knots and then see how similar or different they are to the ones on sites like animated knots.
Sweet! The method is working! That’s very good to know. Honestly, no, it doesn’t have a name – it’s essentially a method I picked up off Innovative Fibre Arts, but I used my own preferred positioning instead. Might be cool to come up with a name based on the position – if anyone has any ideas I’m open to that
Thanks a lot
Absolutely my pleasure 🙂
Very clear and easy to understand but the underlying issue is that I have no one to practise it on and no one to practise it on me. What should I do?
Hi Daniel!
That’s a very common problem, and it’s one I’ve addressed in this post here https://www.ropeconnections.com/the-biggest-problem-with-practice-and-how-you-can-fix-it/. As for finding people to tie or practice with, I have another post related to that here https://www.ropeconnections.com/finding-partners-and-teachers/
Tied my own ankles together first try. Was quite proud. I immediately sent a picture to my boyfriend!
I’ll bet that was a fun picture for him to receive!
I think I’m the only one that is asking for a video.
Beautiful knot. I used on my wife a couple of days ago.
Thank you! Glad you enjoyed using it 🙂
I also wish there was a video! They are more helpful to me. Thanks!
Used this knot to tie my girl’s ankles while she was wearing high heels. Took a couple of pics and showed them to her and she was blown away by how hot her legs looked!
Hey i just found this place while googling my partner and i are branching out into bdsm amd you have already been a tremendous help and ive only been on your site for a few minutes very easy to follow along while providing the answers to most if not all my questions.
this was SUPER easy to follow and understand thank you
Yesss! Really glad that worked for you
Pete, first thank you so much for sharing.
I have made a similar modification to both this and your single column tie, and I would like to hear your opinion.
On both ties I found the wrapped ropes did not want to stay flat against the column. This causes the wrap ropes would see uneven tension against the column on that side. In both case where the night turns 90 to start the tie,when the bight returns rather than laying it beside it I bring it back through itself to lock the ropes in place. The rest is the same. I’ll email you a couple pictures since I can’t post them here.
Please let me know your thoughts on this.
Very very interested! I’ve emailed you so that you can share the pics and I can understand how that works 🙂
This is really well explained and even though I had to do them to myself cause I have no one to tie me, I still managed through and had lots of fun learning this. I’m definitely gonna try more knots and different ties. The instructions were clear and easy to follow. Thank you for sharing this with us!!
Thanks Laura! I’m still using that exact technique. I’m glad I was able to share it well 🙂
Hi great ties. I am a little confused on hot to ‘cross over’ the ends if the rope for the two collum tie. If I have my bight coming up from the right bottom and my ends coming up from the left top, how do I end up with my bight on the right after crossing them over?
Call it a Rig Knot?
“The bight, marked with arrows in this picture, then goes through the loop I made in the previous picture, and then under just the TOP set of wraps, on this side of the wrist.”
i’m having some trouble with this specific instruction and the following picture. What do you mean exactly by “top set of wraps”?
The instructions all in all are pretty clear, but the pictures sometimes feel like they are missing a step or a clear bight in frame. I’m glad others are understanding it better than i am ^^ but when i tried this on my girlfriend, with the instructions in front of me, it just ended up looking messy. Functioned well enough for a first try though! Definitely going to do that more often!
Hi Richard! I meant the band of rope on the top of the wrists in the picture. The rope is wrapped around the wrists, so that there is rope both on top and underneath – for that stage of the tie, the rope just goes under the top band.
Hi, as a newbie how long a length of rope would I need to tie this knot please?
Maybe better if you used different colour arrows for the bight & the trailing end 🤔.
This was helpful, thanks!
Hi! This was super helpful and from my research, it looks a lot safer and nice than a handcuff knot! I did have to look up a video of what a Sommerville knot was to fully grok this, but I’ll chalk that up to my I experience rather than unclear instructions.