The design for this rope dress is something I wanted to learn for awhile, and I’ve finally gotten into it.
My friend Dexter has been tying bondage rope dresses onto people for literally years. I’d see them wandering about at a kinky party or event having a great time and looking kinky and hot, and think “I should really get around to learning that” and now I finally have.
It’s a really nice way to do a little bit of rope bondage that’s not too intense; when you have someone who feels like enjoying rope but can’t handle being restrained just now, this is a great way to do it.
So hey; here are some notes to enjoy on how to do it.
The techniques involved are actually pretty simple.
To start with, we need a particular kind of single column tie. In this instance, it’s the Sommerville Bowline, and the reason for this is that the Sommerville Bowline always ends with the bight sticking out pointing a particular direction. That’s really handy for starting this dress.
So here’s how to do the Sommerville Bowline, demonstrated on my leg.
The Sommerville Bowline
We start with the standard two wraps going over the limb.

Then we turn the bight at right angles, over the two wraps we’ve already created.

While we’re holding our band and bight in place with one hand, we use the other hand to wrap an open loop around the bight. You want to make sure that the loop goes beneath the bight, and the bight is still sticking out.

You see how there’s a hole in the loop on the right side of the band in the above picture? In a second, we’re going to put a couple of fingers through there and beneath the band, using the hand that just created the loop. Our other hand is still holding everything in place (but I had to move mine to take a photo).

Having successfully slid out fingers through, we’re then going to capture the bight between our fingers like a pair of tweezers, and then pull the bight beneath the band and through the open part of the loop our finger went through. Again, I’m holding the camera; otherwise my left hand would still be holding the band in place while my right hand grabbed the bight and pulled it through.


In order to finish the knot, you maintain some tension on the bight you’ve just pulled through so it doesn’t go anywhere, and you pull the working end to close the knot on itself. And there you have your Sommeville Bowline.

See how the bight ends up sticking out that way? That’s useful. Also, here’s a youtube video as well, just in case people are struggling with the photos.
Moving on!
For the second part of learning to make a bondage rope dress, I’ve chosen to utilize the lightning wrap technique. I like it, I think it looks cool, and it comes off really freaking easily once you’re done with your rope dress.
The Lightning Wrap Technique
Now that we’ve got our single column tie with it’s bight positioned just how we want it, we’re going to make use of that bight.
We’re going to take hold of our working length of rope a little way down, and begin pulling it around our column and back to this side, so that we have a doubled length approaching the bight. We’re not working with the end of the rope – we’re taking hold just a little way down, and pulling the body of it around.

We want to do this in such a way that we’re about to pull through a doubled length of our working end, just a short way, as in the next picture.

We’re going to hold that little loop in place, and then repeat the process with the body of our rope, passing it back around the limb in reverse, and then pulling a small loop through each new bight that we create.

We basically repeat this process, going around our column until we’re as far up as we want to go.

How we finish this is… tricky. I’m still working on how I want to do that in an ideal situation. When I was doing this, I effectively just ended up splitting my rope and tying a double knot on the other side of my leg. It looked messy.

But! What’s extremely cool is that you do get a cool lightning pattern going down the column. and when you untie your finishing knot, it comes apart extremely easily.
So now that you’ve learned this technique…
You have everything you need to create a rope dress.
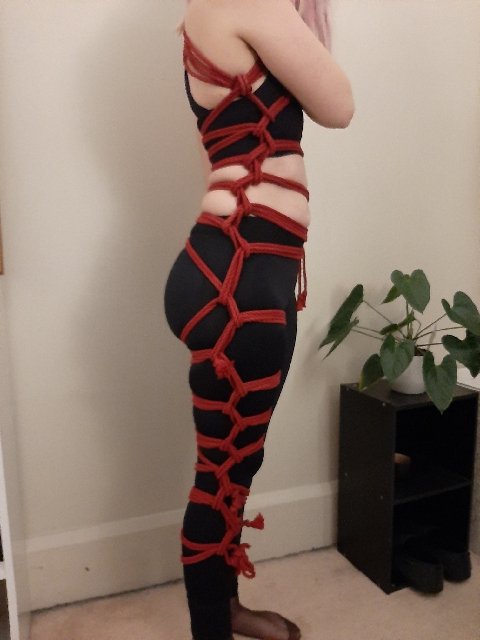
The Lightning Rope Dress.

Unfortunately I’m short on models at the moment, but with the two techniques and the above picture, I can explain it reasonably well.
Essentially, you’re treating your person’s entire body as your column.
You start with a single column tie going over one shoulder, and beneath the armpit on the other side. Not IN the armpit; just beneath it. You want it to lie flat, and not be too tight; you don’t want to be putting untoward pressure on the person’s neck.
The Sommerville Bowline is going to wind up positioned just beneath the armpit, with the bight pointing down.
Then you start making your Lightning Wraps going around the torso, above and below the breasts, and continuing downwards.
When it comes to wrapping around the torso while still holding those loops in place… I find that I often use my teeth, gripping the loop while my hands wrap rope around. It’s a little bit sexy and intimate.
Once you get to the waist, you simply continue down one leg. With a little experimentation, you can figure out where to place your wraps to emphasize the butt cheek on that side as well.
Yes, it does mean it’s an asymmetric rope dress, but it’s pleasingly so, I find.
Pro-Tip: If you want this to last, make sure you do your leg wraps snug. Otherwise those wraps very quickly start to sag and look messy as your person moves about while wearing the dress.
Lastly, this dress does have some play potential. The doubled bands are quite sturdy, and you can easily throw your person around in them. The rope doesn’t block anything important, and you can easily tie your person’s arms to the bands at some stage if you want to add further restriction.
So if you wanted to, you could effectively treat it as an asymmetrically aesthetic bondage harness as well!
Here you go guys! If anyone comes up with a better way to finish the dress, please add it in the comments, I’d really appreciate it!

