And the tutorials resume!
This one is about how to tie an armbinder, using the classic “arms behind the back” version. There are a few different uses for this tie.
What I Would Use It For:
Use The First:
First, of course, there’s the basic wrists-bound-behind-behind-the-back restraint.
However, this tie is more restraining than your basic wrist tie, because it limits the mobility of the arms themselves. When you watch someone try to get out of rope, you’ll notice that they bend their elbows a lot as they twist around and try to get leverage to yank at the wrist tie. What this tie does is take away the advantages of elbows. Suddenly, the bottom can’t bend there. There’s an extra degree of powerlessness.
Believe me, that has an impact on their state. Really adds to the moment before you do whatever else you’ve decided to do.
Use The Second:
If you’re tying a female bottom, then this tie forces their shoulders back, and their chests out. It leaves their entire front vulnerable, and emphasizes their breasts.
Which of course looks fucking delightful, but also makes the bottom acutely aware of their vulnerability and the potential for sexual objectification. You can create a lot of fun by pointing this out – how delightful it looks, how fucking gorgeous she is, how you’re going to have all the fun in the world with those lovely breasts. And she has absolutely no power to stop you.
So much fun.
With men, of course their chests will be emphasized as well, but really you’re going to be enjoying muscles more than breasts. Not quite the same effect, but still fun if you’re into that.
Limitations:
I’ve noticed that some rope bottoms don’t have the flexibility to do this for long. With one woman, I found that just having her shoulders back in the position required pinched a nerve and caused pins and needles, even before rope was placed. So you’ll definitely get variable results with different rope bottoms. Stretching helps a lot to improve flexibility, however I suspect with your more muscled rope bottoms, you’ll likely get more of those nerve issues when bunched muscles pinch a nerve.
You also don’t want to place someone on their back while they’re in this tie, unless you really want to make them uncomfortable and miserable. It’s just unpleasant, and could lead to harmful things happening to their arms.
How To Create The Armbinder:
(Note: if you have any difficulties with some of the terminology here, consult the glossary)
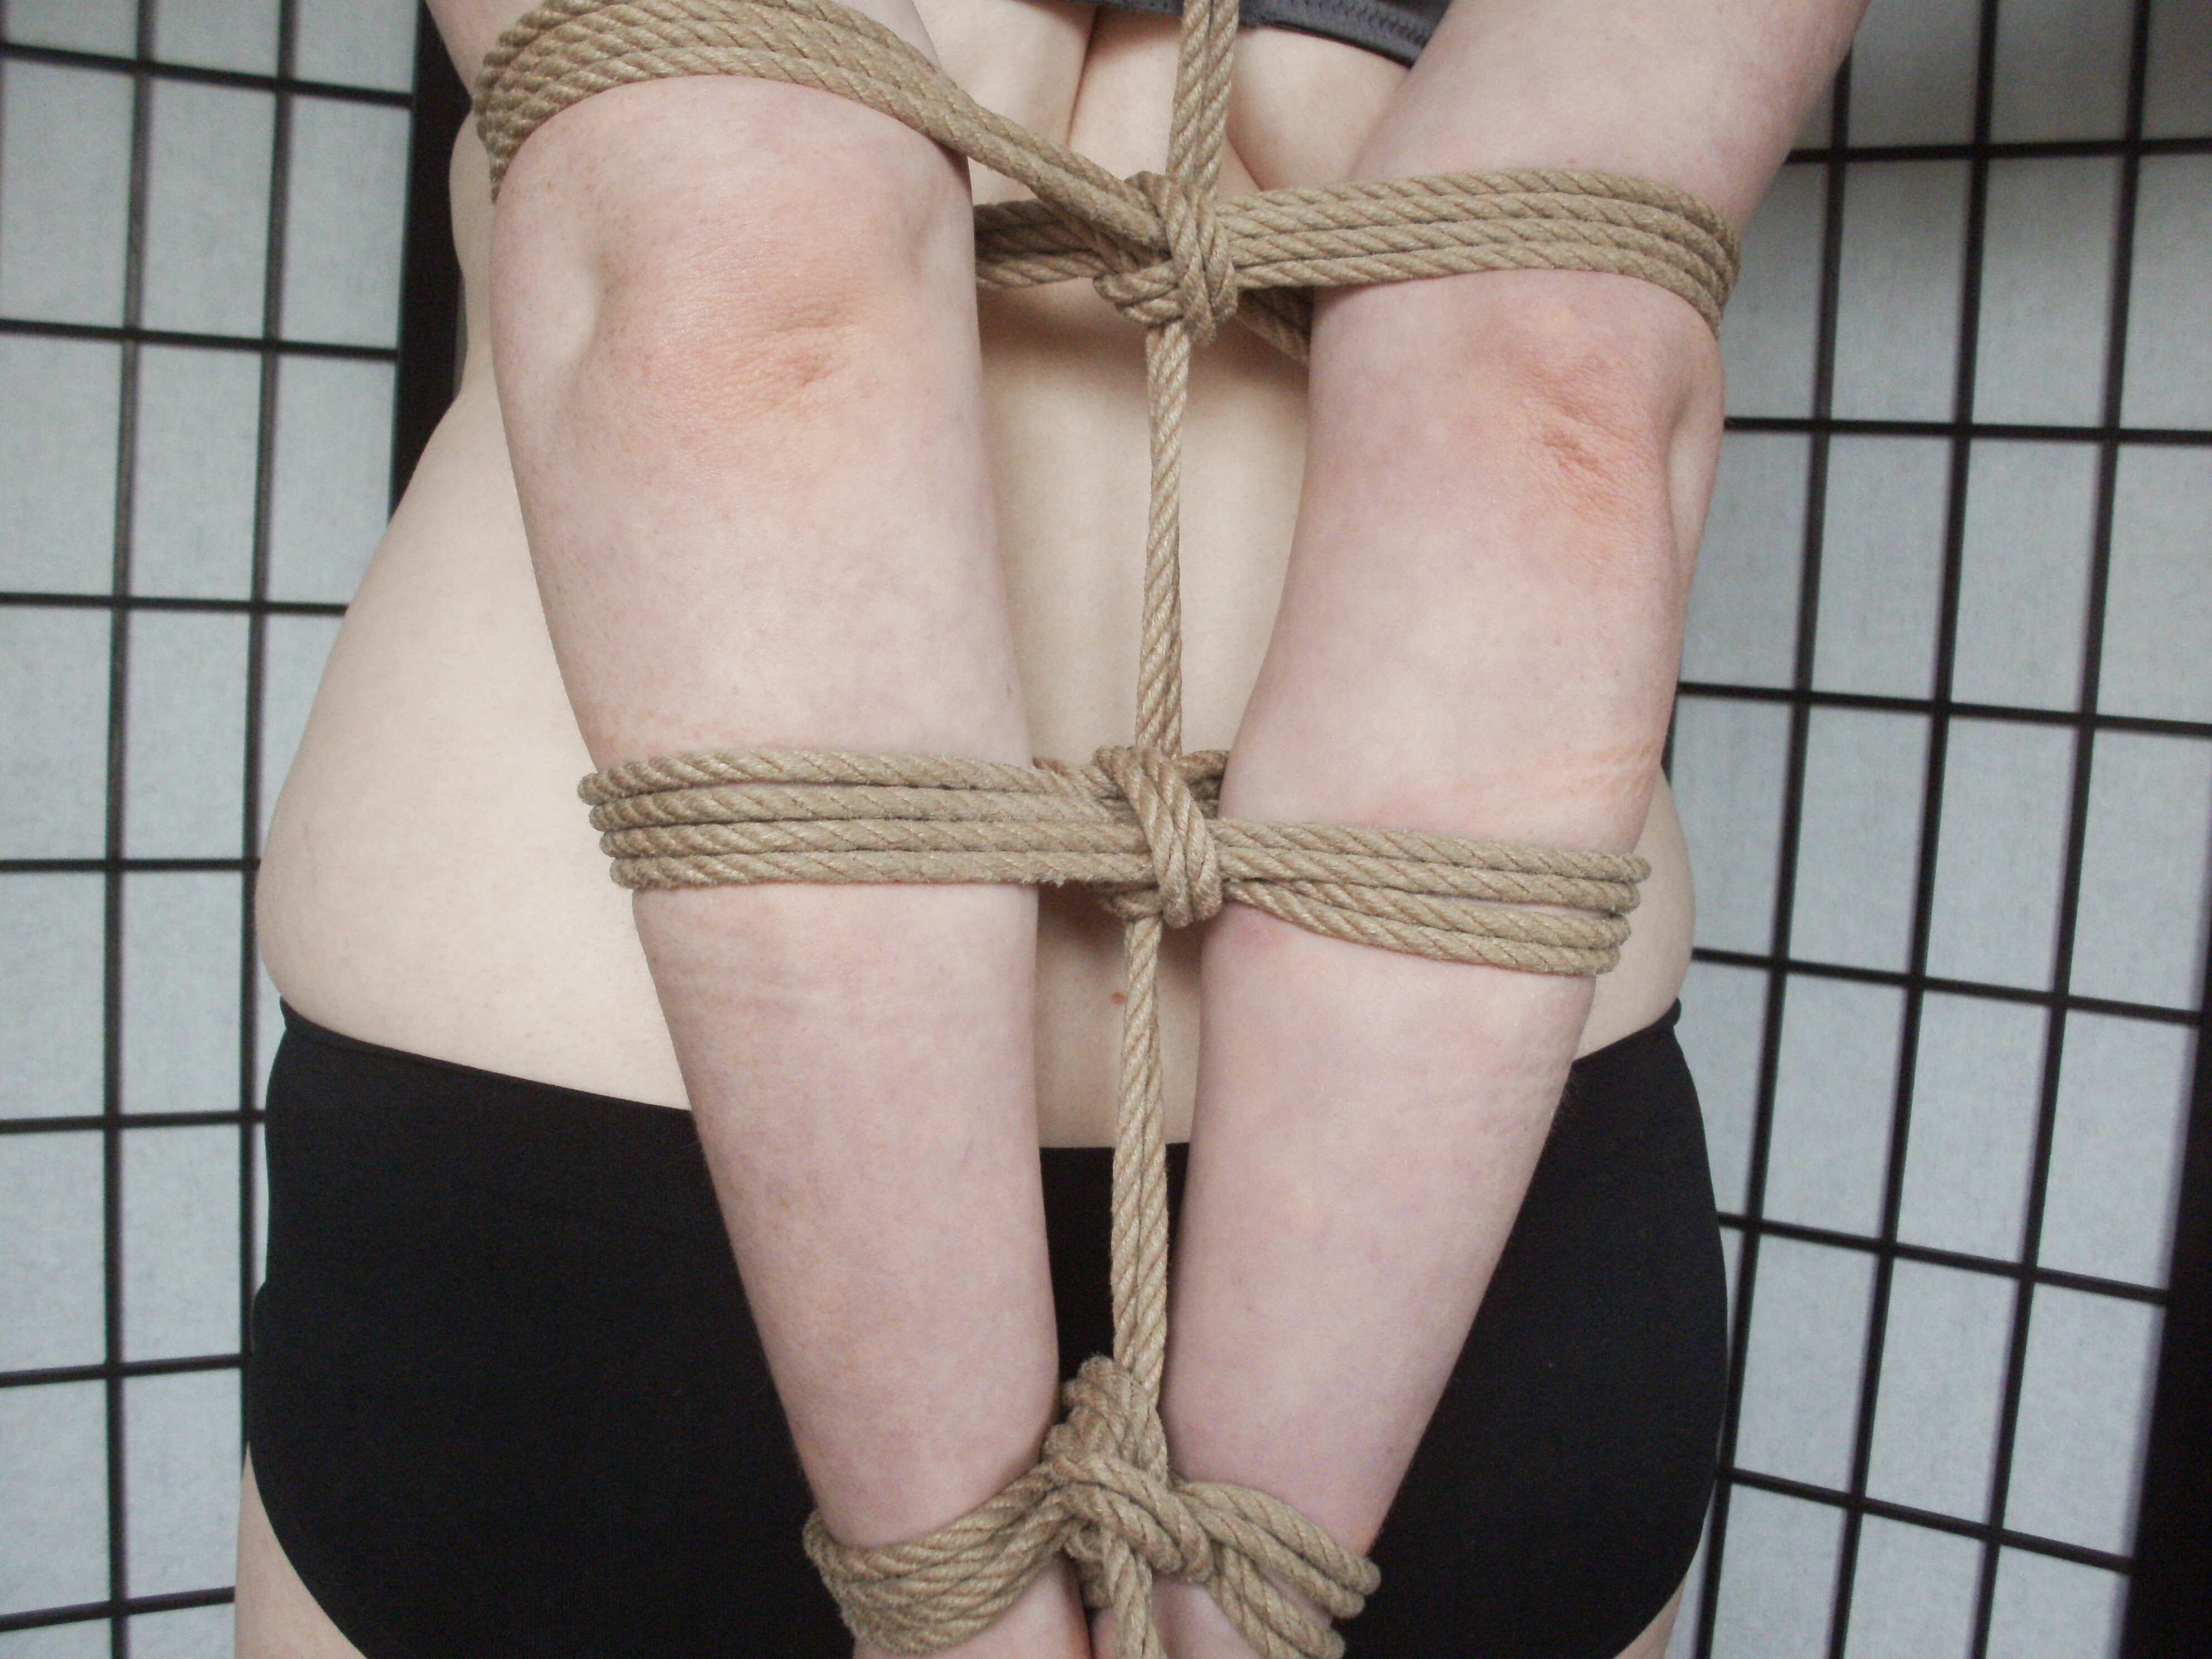
Start with a double column tie around the wrists.

Bring the rope up until just below the elbows, then wrap around. Make sure to maintain your tension as you go. I like to put one arm around both of the rope bottom’s arms to hold them together while the other hand wraps (additional dominance to the tying process, plus holds the arms together), but hey, use what works for you.
If I’m using thinner rope, then I’ll wrap twice around the arms to spread the pressure, but if thicker, then once works fine.

So here I go creating a friction by wrapping under the bands and then pulling upward. This helps me to maintain my tension, and prevent the tie from falling apart (it does take some practice, so if you don’t get it the first time, that’s okay. Practice more!)

So now I’ve done a very simple friction by wrapping under both bands, going down again to complete the wrap, and then pulling back up. The friction has locked off my tension nicely, and looks reasonably clean and simple. (Note that this also forms a cinch; that makes it more restricting by pinching the bands behind and in front of the arms together, so they have even less room to move around. )

Now, I’ve used the exact same process to create another band above the elbows. This is because it puts less pressure on the actual joint; you do NOT want to fuck the joints up, so putting the pressure of the bands above and below the joint instead of directly on it is generally considered a wise move. In this picture below, I’m also taking a moment to dress my wraps, running my fingers below them to bunch them together. This makes certain that the tension and pressure are even, and reduces the risk of pinching skin in unpleasant ways.

Side benefit of dressing your wraps: it makes everything look a bit prettier, neat and tidy like.

So you can put as many bands as you like on this tie; I’ve gone with two for simplicity’s sake, but you can do more if you feel like it. Eventually though, you need to figure out some way to make the whole thing stay up. If you don’t find a way to do that, the whole assembly is going to slide down the triangle that is your rope bottom’s linked arms, and look silly.
I like to create a wee harness, to lock everything in place and further emphasize the breasts. Because hey. Breasts. They’re pretty.
So below, I’ve added on some rope (slightly messily) and I’m about to create the simplest practicable harness. I could just do a couple of wraps around the chest; I have seen that done; but I like harnesses.

So, I bring the rope up over a shoulder, and then down on the inside of one breast.

I then bring the rope down, underneath one arm, and across the back, beneath the stem of the rope going up. Going beneath looks tidier and allows the rope to lie flat against the skin.

I then take the rope beneath the other arm, and up, again on the inside of the breast. I am, in effect, creating straps.

Right, now I’m bringing the rope back down to the existing intersection, and I’m about to create a neat little friction to lock off my tension before continuing.

See? Very simple, but it does lock off the tension, and now allows my rope to travel horizontally.

So I’ve brought the rope around horizontally beneath the arm, and now I’m wrapping between the two straps. This prevents them from slipping to the side and falling down the arms, which would then let the whole armbinder slide downwards.

If you like, you can then vine the rope around and create a nifty little handle, but if you like the way it looks as is, there’s no need. (Me, I like handles. Makes it easier to throw people around on a bed.) After the handle, I continue to bring the rope around horizontally to the back.

At this point, the challenge becomes deciding how to use up the rest of the rope. The harness and the armbinder tie are essentially finished; I just need to lock off. And use up all my gorram extra rope. I could get a bit artsy with it, and use my strands to separate the stem and create diamonds going downwards…

Or I could go with something a bit flatter, and vine upwards between my two rope straps. Always simple and fun to do.

Keep in mind that you can make your harnesses a lot of different ways; just go with whatever you feel like at the time, as long as you feel that it’s effective and will hold your armbinder up.
My student DexterFire created this extremely nifty thing with StarFighter : As you can see, it still performs the same functions of holding everything up, but is more elaborate than the one I just showed you. Have fun! Experiment!

So here you go folks! One armbinder. Lots of fun. Very similar ties also include the TKB Dragonfly harness, which starts at the top and then goes downward. Me, I like tying wrists first to take away that initial bit of power, and then going upward from there.
You can also tie these things in front of a person, rather than behind their back; but frankly it loses a lot of the effect. It’s an inconvenience at best.
I have a bunch more tutorials coming up, so stay tuned, and if you want to get an email to let you know when they’re out, then subscribe at the top of the page!
Thanks to Davion for taking the pictures, and 32Bit for being the model for this tutorial!


I’ve actually used this tie on my wife’s legs and it looks amazing! I have her lay on her belly on the bed and I start on her ankles and work my way up her legs all the way to her arms by using long rope. So visually appealing and has become one of my favorites!